Building an Android prototype app in three days with the help of Android Jetpack

In March 2020 I participated in the #BuildForCOVID19 Global Hackathon which was a call for developers from around the world to come together and build software solutions aimed at addressing the challenges that came about as a result of Covid-19. As part of my team I was tasked to build a prototype Android app and with a short development time of three days I used Android Jetpack‘s components to make this happen. In this talk I gave at GDG Cape Town, I go into detail of how I used Android Jetpack provided the accelerated development I needed to be able to build the prototype in such a short space of time.

The slides for this talk are available here

Joining the fight against Covid-19 with technology – Covid-19 Global Hackathon

Covid-19 has affected the world in a very devastating way. Many countries around the world are recording increases in positive cases on a daily basis. These cases and deaths due to the pandemic has resulted in many governments around the world instituting measures aimed at curbing the spread of Covid-19 which include total lockdowns. These lockdowns, for example here in South Africa, can be for 21 days where individuals are not allowed to leave their homes except for food supplies or medical needs.

These strict lockdown measures have left many around the world for example the underprivileged, the aged, small businesses from various sectors hugely affected and struggling to get by. This has led to many institutions in various sectors including myself looking at ways to help in this dire time.

The Hackathon

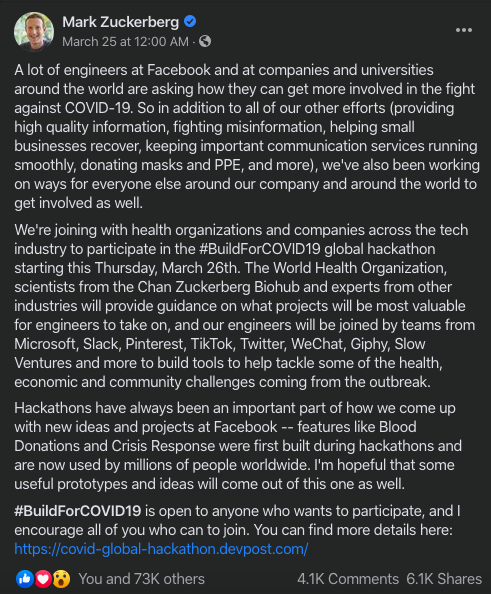
I came across a post from Mark Zuckerberg on March 25th 2020 asking software engineers from around the world to join in the fight against Covid-19 by participating in the #BuildForCOVID19 global hackathon. This hackathon was a collaboration with health organisations including the World Health Organisation (WHO) and companies across the tech industry with a goal aimed at building software solutions that aid in tackling some of the health, economic and community challenges facing the world right now. The engineers in the hackathon were joined by teams from Microsoft, Slack, Pinterest, TikTok, Twitter, WeChat, Giphy, Slow Ventures and more. I had no hesitancy in joining this hackathon in helping in this fight against Covid-19.

Post from Mark Zuckerberg on Facebook asking engineers to join #BuildForCOVID19

I signed up on DevPost as well as on Slack where the majority of the hackathon communication between the different teams took place. On Slack engineers would collaborate with other like-minded industry specialists, build or add to a team and turn their project idea into either a live working solution or a prototype. I came across a Slack post from FerasNaser.com for a project that was in need of engineers including Android to which I reached out.

I was invited to a Slack channel where in addition to the virtual meetings we had on Google Hangouts and Zoom, we coordinated with each other around the completion of our prototype. We had our first Google Hangout where we had introductions and Feras gave us a run down of the different potential projects he had in mind from which we were to pick one for the hackathon.

We all agreed on an educational solution for rewarding children with a virtual currency for completing a course on our platform. The aim of this project, which we called LIAM, named after my second-born son, was to allow children to learn, earn, create, sell and buy their creative achievements.

LIAM

Our multinational team consisted of Feras Naser an entrepreneur from Jordan who conceptualised the project idea; Eric Malaba from Uganda who configured our server using Cloudinary and Heroku and fulfilled the role of Web Tech Lead; Mohammed Thasheel from India, a React developer who helped build the website frontend; Sid Anand a student from Canada helped configure our backend; Joshua Odoi from Ghana who contributed to the website design flow and development and I served as Mobile Tech Lead and built the Android prototype app.

We hit the ground running with development starting from the night of Friday 26th March 2020 getting the backend ready for the mobile app and website. We had meetings at various points across the hackathon to discuss the progress and address any issues we might have had.

Lessons learnt

Towards the end of the hackathon we had issues deploying our backend server to a public environment accessible to the frontend clients. Due to this delay it left very little time for the frontend clients especially Android to integrate the backend API on time. Our product then had to be a prototype as the live data was not quite ready for the frontend clients. Trying to sort out these issues was a real challenge for the team and each member was feeling the pressure to deliver a product we would all be proud of.

We all coded furiously across the hackathon period until the night of Sunday 28th March with very little rest in between. From working until late the Friday and Saturday then waking up at 5am to resume coding again. Despite the little rest we were all motivated by the potential impact of our project for children around the world, we all wanted this product out there for the world to use one day. We all pushed through the various technical issues we had and submitted our project the Sunday night.

Each of us can help in one way or another during this devastating time facing the world, offering our services to those in need. Identify a need in your community or around the world that you could help address. By working together we can beat this pandemic.

Rediscovering My Passion for My Career as a Dev

By Ahmed Tikiwa, originally published on OfferZen

Years ago, being a professional developer involved following a rigid and narrow path of education. Today, this path has become wider, which offers developers endless possibilities to become the dev that they want to be. In this article, I will discuss the obstacles I encountered in going from feeling unchallenged at work to rediscovering my passion. This helped me become more sought-after in this fast-growing industry.

An app as my springboard to new horizons

I worked as a PHP developer for a web and mobile development company for over five years, while mainly assigned to a single project. As the years progressed, the growth scope of the project remained limited. Working on one single project became very tedious and unchallenging, with very few growth opportunities.

Around my third year at this company, I had a spark of inspiration to build an app that would make it easier to find information on US television series. The exciting nature of these shows had me interested in finding out when the next episode would air, but doing so was difficult and involved a number of Google searches that could easily be eliminated by an app. In order to build it, I needed to upskill myself because my PHP knowledge wouldn’t be enough for the various tools I’d eventually have to use.

This springboarded me into my greater journey: I recalled advice from my mentor about the value of having multiple programming languages in one’s toolkit, each with its own strengths, limitations and best use-cases. Specifically, I needed to learn how to develop apps in Android. Taking those first steps led me to a number of challenges:

  • Finding the right teacher
  • Feeling like I didn’t know enough
  • Battling with time constraints

Whenever I overcame one challenge, a new one seemed to appear. However, it was overcoming them that ultimately made me a better developer and enabled me to find that passion that I seemed to have lost.

Finding the right teacher

My first challenge was finding the right teacher – and not just a mentor, but a teacher who would inevitably offer exactly what I needed in order to become a better developer. Over time, each teacher I encountered online made me realise that not all of them carry that natural ability to deliver the information they know in a way that is captivating or that encourages the learner to ask questions. In order for me to excel, I needed to ensure that I picked the right teacher.

I did a lot of research online and found two promising avenues for learning the Android skills I needed: Udemy and Coursera. Each option gave a preview video of what the course entailed, as well as the costs involved – both financially, and in terms of time. I found myself leaning towards the Coursera option, as the lecturer teaching the course had two important qualities: very good knowledge of the content, and a way of explaining things that suggested he had a good approach to teaching. I enrolled into the course, which spanned over a period of eight weeks.

Not long after I had completed the eight week course, I came across another Android course, this time offered by Google and Udacity. This Nanodegree course – a collaboration between these two companies – was exactly the type of product developers like myself need in order to advance themselves as Android engineers. Not only was the course tried-and-tested, but it was being used and delivered by high-ranking companies.

I had no hesitation in enrolling into the course, as the benefits were clear: the majority of the graduates went on to work for top companies around the world, and all that was required was hard work. This course also set itself apart from all the other Android courses as it was offered by Google, who own Android anyway. The rewards I received at the end were worth the high expectation of time and effort. Having done sub-par courses in the past, I came to realise the true value in finding the right teacher.

Feeling like I didn’t know enough

My second challenge, then, centred around me as a developer. This was something I battled with even during the time I was completing the above courses. I had a desire and a passion to build Android apps, but my obstacle was the confidence in my knowledge and expertise to be able to execute this desire. My hunger to know more is what motivated me to continue.

I also felt like I didn’t know enough during the job hunting process with a particular company I encountered. This company specialises in making use of graphics in their apps, and use a very specific Android library to achieve their requirements. I knew I had aimed at something more challenging, but they declined to continue with the interview process because I had not encountered this library before – not even in the Nanodegree.

This, however, did not discourage me. Instead, I realised that you can never be satisfied with the knowledge you have. After the Nanodegree, I continued learning, and never stopped finding out what new libraries were being added to Android. I read articles and watched videos, all with the goal of learning more – and this is something I continue with to this day.

Battling with time constraints

It is not easy studying part-time, being a husband and a father, and still working full-time. A lot of time had to be sacrificed after-hours in order to be able to juggle everything at once. The Udacity course alone took close to a year.

Typically, every fortnight to a month, you would be required to submit a project, which was an Android app that you would build from scratch or improve on based on the lesson requirements. This meant spending very little time with my family after work, and working through the evening until just after midnight. After about a month or so, I had to change from working three nights a week to working every night, as the deadlines were fast approaching and required more time.

Thankfully, my wife was incredibly supportive because we both value education. There were times when I felt so burnt out that I considered whether it was worth doing the course at all, putting in hours that I could have been spending with my wife and kids. Without my wife’s support, the time constraints would have gotten the better of me.

When I graduated with my Nanodegree, my Android knowledge had grown to the point where I could confidently search for new opportunities as an Android engineer.

Finding a new job

After I completed my eight week course, I was fortunate enough to be offered a position as an Android developer in addition to working as a PHP developer at my company. I would split my day between the two languages, working on either language for half of the day.

After working like this for a couple of years, I wanted to fully move over to Android. My company however was not able to offer a removal of the split, as the PHP side required my daily involvement. Sadly, to continue pursuing my passion, I had to start looking for work elsewhere.

Despite not having any luck initially, many recruiters contacted me with various opportunities after seeing my updated LinkedIn profile. One in particular had an Android developer opportunity that interested me, from a leading online fashion retailer. Although this would mean going into a new, unfamiliar industry, I was intrigued. I went for the interviews, did the required project, and got offered the job.

Getting this offer was a huge turning point in my life. It showed me that all the hard work, the late nights and the sacrifices had finally paid-off. Each challenge brought a valuable lesson, which have culminated into me getting the position I am in today. I know that this opportunity was certainly not the last, and only the beginning of my career as an Android engineer. I did this despite the amount of time and hard work required on my part, and by the end I had managed to fulfil my goal: I was able to create Android apps, add a skillset to my expanding toolkit, and rediscover my passion and my fulfilment.

Generate a free SSL certificate with Let’s Encrypt and Certbot

Acquiring an SSL certificate can be expensive especially when you are running a website that is not necessarily generating any form of revenue like a blog. Thankfully Let’s Encrypt has provided a mechanism for generating an SSL certificate for your website for free. These certificates, however are only valid for a period of 90 days at a time and can be updated with a simple shell command when they are due for renewal. This article will show you step by step on how to generate a certificate for your website using Certbot ACME client. You will need to have shell access to your web host in order to be able to install and run Certbot.

Cerbot Prerequisites

There are some pre-requisites for setting up Cerbot:

  • You need to be comfortable with using the command line and execute shell commands
  • You need an HTTP website that is already online. If you have not done so yet, you will need to set this up first before continuing with this article
  • This website needs to be hosted on a server that you can have SSH access to with the ability to sudo

Installing Certbot

SSH into your web server and run the following commands to get Certbot installed:

$ wget https://dl.eff.org/certbot-auto
$ sudo mv certbot-auto /usr/local/bin/certbot-auto
$ sudo chown root /usr/local/bin/certbot-auto
$ sudo chmod 0755 /usr/local/bin/certbot-auto

Running Cerbot and generating the certificate(s)

To get an SSL certificate and have Certbot edit your Apache configuration automatically to serve it, turning on HTTPS access all in one single step, simply run:

$ sudo /usr/local/bin/certbot-auto --apache

This command will run a scan of the Apache configured websites on your server and present you with options for which site or sites the Certbot can generate an SSL certificate for:

Saving debug log to /var/log/letsencrypt/letsencrypt.log
Plugins selected: Authenticator apache, Installer apache

Which names would you like to activate HTTPS for?
- - - - - - - - - - - - - - - - - - - - - - - - - - - - - - - - - - - - - - - -
1: mysite.com
2: othersite.com
3: myotherothersite.com
- - - - - - - - - - - - - - - - - - - - - - - - - - - - - - - - - - - - - - - -
Select the appropriate numbers separated by commas and/or spaces, or leave input
blank to select all options shown (Enter 'c' to cancel): 1

Once you have selected your option from the list and pressing enter, the Certbot will begin the generation process:

Obtaining a new certificate
 Performing the following challenges:
 http-01 challenge for mysite.com
 Waiting for verification...
 Cleaning up challenges
 Created an SSL vhost at /etc/apache2/sites-available/mysite.com-le-ssl.conf
 Deploying Certificate to VirtualHost /etc/apache2/sites-available/mysite.com-le-ssl.conf
 Enabling available site: /etc/apache2/sites-available/mysite.com-le-ssl.conf

Certbot will then present you with two options for HTTPS redirection:

Please choose whether or not to redirect HTTP traffic to HTTPS, removing HTTP access.
 - - - - - - - - - - - - - - - - - - - - - - - - - - - - - - - - - - - - - - - -
 1: No redirect - Make no further changes to the webserver configuration.
 2: Redirect - Make all requests redirect to secure HTTPS access. Choose this for
 new sites, or if you're confident your site works on HTTPS. You can undo this
 change by editing your web server's configuration.
 - - - - - - - - - - - - - - - - - - - - - - - - - - - - - - - - - - - - - - - -
 Select the appropriate number [1-2] then [enter] (press 'c' to cancel): 2

If you choose option 1 then no further changes will be made by Certbot. If you choose option 2, then Certbot will update the virtual host configuration for the site it generated the SSL certificate for:

Redirecting vhost in /etc/apache2/sites-enabled/mysite.com.conf to ssl vhost in /etc/apache2/sites-available/mysite.com-le-ssl.conf 

 - - - - - - - - - - - - - - - - - - - - - - - - - - - - - - - - - - - - - - - -

And that’s it! Certbot has successfully generated an SSL certificate for your website for free!

Congratulations! You have successfully enabled https://mysite.com

Testing whether the SSL certificate is working correctly

Certbot will provide you a URL to check your SSL certificate status after it has completed the generation process.

You should test your configuration at:
 https://www.ssllabs.com/ssltest/analyze.html?d=mysite.com
 - - - - - - - - - - - - - - - - - - - - - - - - - - - - - - - - - - - - - - - -

You can also check the https version of your website which should now work and display a lock next to the URL.

Things to note

There is also some additional important information that is displayed by Certbot. This information includes details about where the certificate and chain are stored on the server and when the just generated certificate is due to expire, so pay attention to this:

IMPORTANT NOTES:
  - Congratulations! Your certificate and chain have been saved at:
    /etc/letsencrypt/live/mysite.com/fullchain.pem
    Your key file has been saved at:
    /etc/letsencrypt/live/mysite.com/privkey.pem
    Your cert will expire on 2019-10-19. To obtain a new or tweaked
    version of this certificate in the future, simply run certbot again
    with the "certonly" option. To non-interactively renew *all* of
    your certificates, run "certbot-auto renew"
  - If you like Certbot, please consider supporting our work by:
 

    Donating to ISRG / Let's Encrypt:   https://letsencrypt.org/donate
    Donating to EFF:                    https://eff.org/donate-le

Setting up a cron to update the SSL certificates for you

Remembering to update the certificates when they are due can be a tedious process. Thankfully Certbot can also be executed by a cron job which will periodically check for you if any of the certificates it generated are due for renew. Simply run the following in the terminal which will add a cron job for you:

echo "0 0,12 * * * root python -c 'import random; import time; time.sleep(random.random() * 3600)' && /usr/local/bin/certbot-auto renew" | sudo tee -a /etc/crontab > /dev/null

Help and Support

Should you encounter any errors with Certbot, feel free to visit the Certbot Help page which contains a list of helpful information.

I hope this article was very helpful. Now go and generate those certificates!